
Barbarian Armor Set
The Barbarian armor set is a returning armor set in Legend of Zelda: Tears of the Kingdom and is an armor set that was once favored by an ancient warlike tribe from the Faron region. The war paint boosts Link’s spirit, giving him an attack bonus. It requires hunting down the pieces across Hyrule in several different areas. This page covers how to find the complete Barbarian armor set in TotK.
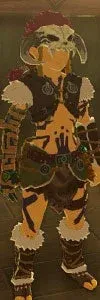
The Barbarian armor set is a returning armor set in Legend of Zelda: Tears of the Kingdom and is an armor set that was once favored by an ancient warlike tribe from the Faron region. The war paint boosts Link’s spirit, giving him an attack bonus. It requires hunting down the pieces across Hyrule in several different areas. This page covers how to find the complete Barbarian armor set in TotK.
The Barbarian armor set comprises of three pieces:

Where to Find the Barbarian Armor Set in ToTK
Use the Barbarian Armor Set map to see the locations of each cave entrance, and read the complete walkthroughs below for more details.
Barbarian Armor
The Barbarian Armor is located to the northwest of Hyrule Field, in the Crenel Hills cave which is in between Hylia River and Crenel Hills.
As you get deeper into the cave, it opens out into a larger area. In the middle is a stone talus. It’s easy to avoid, by circling around the edge of the cave until you get to the opposite side.
There you’ll find a large collection of luminous stone – smash through it using a bomb arrow or boulder-sword fusion.
Climb up through the opening to find the chest (location 0631, 0818, 0027) containing the Barbarian Armor.
Barbarian Leg Wraps
The Barbarian Leg Wraps are found directly south of Mount Lanayru, hidden deep within the Walnot Mountain Cave, which unsurprisingly is near Walnot Mountain, to the southwest towards Retsam Forest.
As you enter the cave there are two paths - one that drops down to the left and one that goes up to the right. Take the high right path. You’ll face a couple of Horriblins up ahead - they’re pretty tough if you’re low-level, so run past them if you don’t fancy a fight.
Keep going until you see the rocky ledge with an ice Like Like hanging above. Wait for the Like Like to spew its icy attack, dodge past it and jump over the gap to the other side, to the smaller cave containing the chest (location 4053, -1879, 0155).
However, the chest is completely frozen over, so you need to melt the ice. A flame emitter works a treat if you have one, but starting a fire with wood and flint also does the job.
Once the ice is melted open the chest to get the Barbarian Leg Wraps.
Barbarian Helm
The Barbarian Helm is found in the Robred Dropoff cave, which can be found between West Necluda and Mount Lanayru, at the bottom of the chasm to the west of Robred Dropoff. There are a load of weird statues nearby, which makes the cave entrance easier to find.
The cave itself is a bit of a maze and the key to navigating it is the statues. As long as you head in the direction they’re facing you’ll be fine. So at the first junction, turn right and follow the tunnel round.
Drop down and into the next area, which has four groups of statues. Three of the groups are facing towards each other, but one group is facing a boulder wall. That’s where you need to go, so smash to the rocks with bomb arrows or a rock-hammer.
Keep this weapon to hand for the next area, which is straight ahead. It’s a room filled with a bunch of Bokoblins and a Boss Bokoblin. There are a lot to take on all at once, so the better option is to smash through the rocks on the ground and drop down to the area below before you take too much damage.
You’ll land in a shallow pool at the bottom. Swim out and down the tunnel to the next area, in which you’ll find another three groups of states – five on the left, one in the middle and three on the right. You’ll want to climb on the platform on the right with the three statues, then use Ascend to warp through to the room above.
At the top you’ll see the chest (location 2536, -1541, -0024) behind the three statues. Head on over and open it to get the Barbarian Helm.
Don't miss the rest of the Armor Sets and Locations, as well as checking out Masks and Unique Armor for even more special digs!
Barbarian Armor Set Upgrades
After you find and unlock the Great Fairy Fountains in Hyrule, you can bring them ingredients and a donation of rupees to increase the armor value of each piece of armor. All pieces of the Barbarian Armor Set will require the same materials to upgrade each. See the table below for the ingredients needed and defense bonus you can gain for each piece of armor.
- Upgrading each piece to level 2 will unlock the Set Bonus: Charge Atk. Stamina Up
Level
Materials
Defense Level
Base
N/A
3
★
10 Rupees (3) Mighty Thistle
5
★★
50 Rupees(2) Lynel Saber Horn(2) Lynel Mace Horn(5) Razorshroom
8
★★★
200 Rupees(3) Blue-Maned Lynel Saber Horn(3) Blue-Maned Lynel Mace Horn(3) Razorclaw Crab
12
★★★★
500 Rupees(3) White-Maned Lynel Saber Horn(3) White-Maned Lynel Mace Horn(3) Bladed Rhino Beetle
20