
All Yiga Schematic Locations
Yiga Schematics in The Legend of Zelda: Tears of the Kingdom are a Key Item that unlocks build designs, but you won't be able to use these, or see the specific design it unlocks, until you've unlocked a certain ability by completing the main quest A Mystery in the Depths. This page includes exactly how to use Yiga Schematics, how to find them, and all 34 Yiga Schematic locations. Yiga Schematics work similarly to Schema Stones. As a bonus, you'll find Large Crystallized Charges along with the Yiga Schematics. x
Spoiler Warning
If you wish to not know about the ability you need to use Yiga Schematics, turn back now.
How to Use Yiga Schematics in TotK
You won't be able to use a Yiga Schematic or see what it grants until you have unlocked Autobuild, which you can get by completing A Mystery in the Depths, or, you can unlock Autobuild early by going to a specific location in the depths.
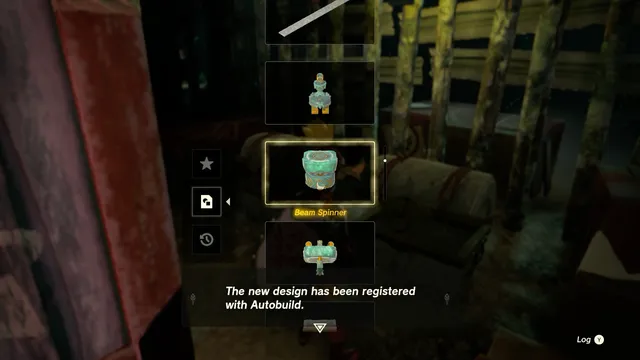
Once you have Autobuild, when you pick up a Yiga Schematic, you'll see what it unlocks.
- Unlock Autobuild
- Open the radial menu and equip Autobuild
- Scroll down to the "Schematics" menu to see the schematics you've unlocked so far
- Choose the schematic you want to build
And that's it! Remember, you'll need the Zonai Devices or enough Zonaite to create these contraptions.
Yiga Schematic Locations
You'll find Yiga Schematics at the Yiga Hideouts in the Depths. First, you'll have to defeat the Yiga Clan guard nearby in order to open the shed the Yiga Schematic is hidden. There are 34 Yiga Schematics - see all of their locations on the map of Yiga Schematic Locations below. We highly recommend getting the Yiga Clan Armor set before tackling these! It's much easier to infiltrate Yiga Hideouts when you're not being attacked.

More detailed information about specific locations coming soon!
Yiga Schematic 1 - Monocycle
Yiga Schematic 1 - Monocycle
This Yiga Clan Hideout is just south of the Great Abandoned Central Mine and Koradat Lightroot. It's defended well by a high, spiked wall that seems to be impenetrable, but luckily we have some tricks up our sleeves to get into the camp. One way is to head to the south side of the hideout and look for the tall mushroom just on the other side of the fence. Then, fuse a Rocket Zonai Device to your shield and use it to get some height and paraglide to the tall mushroom platform.
From this height, you'll see a Yiga member on a flying machine. Shoot them down--this is easier if you attach an eye to an arrow. Paraglide across the way to the tall platform where the sealed room has opened. If you can't make it, there are Zonai devices about you can join together to make a rocket platform to get up to where you need to be.
We attached two rockets to either side of a glider platform.
Inside the chest up above is the Monocycle schematic.
Yiga Schematic 2 - Shock Trap
Yiga Schematic 2 - Shock Trap
This Yiga Hideout is just southeast of the Tatayam Lightroot and Kara Kara Mine, in the southwest area of the Depths. It's protected by electrified barriers.
Use Ultrahand to move the metal platforms to pass them, take out the Yiga Clan member and claim your prize: the Shock Trap Schematic.
Yiga Schematic 3 - Beam Turret
Yiga Schematic 3 - Beam Turret
This Yiga Hideout is in the southwest area of The Depths, south of Amakawis Lightroot and west of the South Lomei Depths Labyrinth. The boss you need to beat here and the sealed room are both up pretty high, and climbing the series of platforms can be a bit tricky.
Head to the small diamond-stamped location in the southwest part of the hideout to find a ladder low enough to climb.
Make sure to deactivate any beam turrets as you climb up the platforms, then shoot down the boss Yiga member with the seal when you see them.
Finish climbing to the top to find the once-sealed room with two chests and claim the Beam Turret schematic.
Yiga Schematic 4 - Vertical Escape
Yiga Schematic 4 - Vertical Escape
This Yiga Hideout is in the southwest of The Depths. It doesn't have any particularly interesting or standout defenses.
Stroll in, take out the Yiga clan member on the vehicle, and claim the Vertical Escape schematic.
Yiga Schematic 5 - Raiding Plane
Yiga Schematic 5 - Raiding Plane
This Yiga Hideout is west of the Birda Lookout Chasm, near the western edge of The Depths. It doesn't have any particularly interesting or standout defenses.
Stroll in, take out the Yiga clan member on the vehicle and claim the Raiding Plane schematic.
Yiga Schematic 6 - Fan Boat
Yiga Schematic 6 - Fan Boat
This Yiga Hideout is very close to the Umamustor Lightroot which is right next to the Yiga Clan Hideout Chasm. It's also just northeast of the Birida Lookout Chasm - these locations are below the Gerudo territory in the southwest.
The seal is protected by a Yiga member on a raft. We paraglided onto a high point to easily take them out. Go inside the previously sealed building to claim the Fan Boat schematic.
Yiga Schematic 7 - Smoke Rocket
Yiga Schematic 7 - Smoke Rocket
This Yiga Hideout is down deep within the depths south of the Mustuto Lightroot, and its sealed chests are hidden high above in a tower.
Use Ascend to get up high enough to take down the Yiga Member on a flying machine easily.
Then, grab the Smoke Rocket schematic from the chest behind the now unlocked door.
Yiga Schematic 8 - Instant Scaffold
Yiga Schematic 8 - Instant Scaffold
This Yiga Hideout is right next to the Kawakarut Lightroot in the western part of the Depths.
The chest hut is hidden on top of a tall cliff, and the Yiga member you need to defeat circles it in a flying machine. You can either use Ultrahand to move the scaffolding steps attached to the rock to make a path up, or attach a rocket to your shield to bypass the puzzle. Shoot the Yiga member down and collect the Instant Scaffold schematic from within.
Yiga Schematic 9 - Three Wheeler
Yiga Schematic 9 - Three Wheeler
Find this Yiga Hideout just northeast of the Muzasu Lightroot, which is sort of just to the west of the most central area of the depths. The hideout is protected by spikey fences arranged into a maze.
Luckily, you can use Ultrahand on one of the many floating platforms around to move it up high. Then, move it back down, get on it, and use Recall to be lifted up.
From up high, you should be able to see your target on a track below, and then paraglide over to the hut. Inside the chest is a Three Wheeler Schematic.
Yiga Schematic 10 - Bomb Bouquet
Yiga Schematic 10 - Bomb Bouquet
This Yiga Hideout is south of the Kawaanis Lightroot, northwest of the center of the Depths. Reaching the top of this series of pillars can be tricky if you don't already have your own flying machine. You can always shoot down the low patrol flying vehicle, commandeer it, and then add rockets to each wing tip so that it blasts you up high into the air.
From there, you'll be able to see the sealed room and the patrolling flying machine.
Defeat the Yiga member on the flying machine and enter the now open room to get the Bomb Bouquet schematic.
Yiga Schematic 11 - All-Purpose Raft
Yiga Schematic 11 - All-Purpose Raft
This Yiga Hideout is in a lake near the Koro-nui Lightroot, in the northwest part of The Depths. It's protected by spiked fences and electrified gates.
Luckily, there's a spot on the west side of the compound where you can climb a rock. From there, you can use Ultrahand to move one of the electrified gates away, allowing you access. Take down the Yiga member on the boat and claim the All-Purpose Raft Schematic within.
Yiga Schematic 12 - Flamethrower Balloon
Yiga Schematic 12 - Flamethrower Balloon
This Yiga Hideout is nestled between two tall mushrooms in the canyon southwest of the Lindor Canyon Mine. The easiest way to get there is to travel to the Sikurukam Lightroot and head north.
There are two Yiga Footsoldiers guarding this hideout, both of which are operating hoverstone devices with laser emitters attached to them. The good thing about these devices is that they are stationary, so a couple of well-placed arrows are enough to clear your way to the Schematic.
Once you have taken both Yiga Footsoldiers out, head to the top of the mushroom and collect your prize.
Yiga Schematic 13 - Cargo Carrier
Yiga Schematic 13 - Cargo Carrier
This Yiga Clan Hideout is just northeast of the Lindor Canyon Mine, and doesn’t have any significant security measures to speak of. Simply fast-travel to the Nabahi-ikat Lightroot and head northeast until you come across the base.
There are two Yiga Footsoldiers to take out before you can clear your way to the treasure. Both soldiers are operating hoverstone devices with laser emitters attached to them. These emitters will track you, so try your best to stay out of view and snipe them with some arrows before they see you.
Once you have taken care of the Yiga Clan Members, the seal will break, allowing you to make your way into the base and collect your reward.
Yiga Schematic 14 - Sprinkler System
Yiga Schematic 14 - Sprinkler System
This Yiga Clan Hideout is southeast of the Hebra Canyon Mine and doesn’t have any significant security measures in place. The best way to get there is to fast travel to the Aduon Lightroot and make the short trek southeast to the Hideout.
There are three Yiga Clan Members guarding this base. One is on an armored truck patrolling the outer perimeter, the second is on a plane patrolling the skies, and the third is protecting the seal on a mobile flamethrower device. Ignore the plane, take out the Yiga on the armored truck, and drive it straight into the base.
Hop off the truck and use an arrow to take out the seal, making sure to keep your distance so you don’t get burnt by the flamethrower.
Once you have broken the seal by taking out the flamethrowing Yiga Footsoldier, head into the base to collect your prize, the Sprinkler System Schematic.
Yiga Schematic 15 - Excavator
Yiga Schematic 15 - Excavator
This Hideout is a little tricky to get to since it’s at the bottom of a canyon. The best way to get there is to travel to the Muotue Lightroot just east of the Hebra Dark Skeleton and make your way southwest. You can walk, but you could also make a plane device so you don’t have to do so much climbing.
There is only one Yiga Footsoldier guarding this base, but they are driving a Zonai Device equipped with bombs, so you are definitely going to want to have your wits about you.
Consider donning the Yiga Clan Armor to blend in, or just run in guns-blazing and take the soldier out with an arrow while dodging the bombs. Once they are out of the way, head into the hut to collect the Excavator Schematic.
Yiga Schematic 16 - Floodlights
Yiga Schematic 16 - Floodlights
You can find this Yiga Hideout in a deep canyon east of the Hebra Canyon Mine. The easiest way to get there is to travel to the Mu-ufator Lightroot and make your way south from there.
The Yiga Footsoldier that has the seal is flying around the perimeter of the base on a plane. Climb up one of the surrounding roots and glide off to hit the Yiga Footsoldier from above with an arrow.
The base is at the top of a tall pillar surrounded by spiked vines, so burn them off with a Fire Fruit arrow to clear your way to the top.
Yiga Schematic 17 - Whirling Basher
Yiga Schematic 17 - Whirling Basher
This Yiga Clan Hideout is a little ways northeast of Hebra Canyon Mine and is almost completely surrounded by Gloom. Equip your Depths Armor Set if possible and make your way southwest of the U-nazohso Lightroot to reach the Hideout.
There are two Yiga Footsoldiers to contend with here. One on an armored truck, and the other on a hoverstone laser emitter device. Avoid the armored truck and sneak up on the hoverstone. Take the Yiga Footsoldier out before they notice you and run into the base to collect your prize.
Yiga Schematic 18 - Fishing Trawler
Yiga Schematic 18 - Fishing Trawler
You can find this Yiga Clan Hideout floating on a lake west of Minshi Grove. To get there, travel to the Netamnet Lightroot and head northeast until you reach the small lake.
This Hideout is pretty well protected with a Yiga Footsoldier on a plane and several laser emitters stationed around the base. Start by getting to high ground and gliding off to hit the Yiga Footsoldier from above, breaking the seal and unlocking the room. Then hit the laser emitters with arrows to disarm them before sneaking into the base.
Yiga Schematic 19 - Aerial Cannon
Yiga Schematic 19 - Aerial Cannon
This Yiga Clan Hideout is at the very top of the map, just below the King Gleeok Den. To get there, fast-travel to the Nikakik Lightroot and head northeast.
There are several gates blocking your way into the base. Hit the stabilizers on the outside to open them and run in to defeat the Yiga Footsoldier in an armored truck. The truck is equipped with bombs, so keep moving to avoid the blasts while aiming to hit the Yiga Footsoldier with one of your arrows.
Once you do, head into the small hut to collect the Aerial Canon Schematic.
Yiga Schematic 20 - Charged Charger
Yiga Schematic 20 - Charged Charger
This Yiga Clan Hideout is at the very top of the map, north of the King Gleeok Den and west of the Eldin Dark Skeleton. To get there, fast travel to the Katenim Lightroot and head northeast.
There are three Yiga Clan Members patrolling the area on motorcycles equipped with shock emitters. You can take out all three if you want to, or just target the Yiga Footsoldier with the seal and hit him with an arrow to unlock the treasure chest hut.
Yiga Schematic 21 - Assault Cart
Yiga Schematic 21 - Assault Cart
To find the Assault Cart Schematic, head to the Hideout directly north of the Akkala House of Bones. The nearest Lightroot to the Hideout is the Tayamik Lightroot which is just to the east of your destination.
This maze-like hideout is a little tricky to navigate. There is, however, an opening to the south. Deactivate the flamethrower on the gate with an arrow and head inside the maze.
Wait for the Yiga Footsoldier to come flying past on an armored minecart and hit them with an arrow. Steal the cart and hitch a ride to the northeastern corner of the base. Hop off the cart, head deeper into the maze, and take out the Yiga Footsoldier on the minecart in the center of the maze. Then make your way up to the front and into the shack to collect your prize!
Yiga Schematic 22 - Headlight Raft
Yiga Schematic 22 - Headlight Raft
The Headlight Raft Schematic is hidden in a Yiga Clan Hideout in the very northeastern corner of the map. To get there, fast-travel to the Ui-ihcoj Lightroot and head northwest to the lake on the left.
There are a couple of Yiga Footsoldiers patrolling the lake on rafts, but most can be avoided. Sneak over to the southeastern island and use one of the springs to launch into the air. Hit the Seal Footsoldier with an arrow, and head straight into the hut to collect your prize.
Yiga Schematic 23 - Wagon
Yiga Schematic 23 - Wagon
This Yiga Clan Hideout can be found north of the Ulri Canyon Mine and west of the Akinatanis Lightroot.
There are no particularly difficult security measures to overcome, but the Yiga Footsoldier that is blocking your way to the Schematic is on a plane and impossible to reach from the ground. Make your way up the pillars onto the structure and use one of the planes provided to get close to the Footsoldier.
Once you’re close enough to your target, jump off the plane and hit the Footsoldier with an arrow to break the seal. Climb to the top of the Hideout to reach the small hut containing the Schematic.
Yiga Schematic 24 - Big Rig
Yiga Schematic 24 - Big Rig
If you want to get your hands on the Big Rig Schematic, you’re going to have to go to the Yiga Clan Hideout to the west of the Ancient Underground Fortress. This can be found in the Depths under the Akkala region.
To get there, fast travel to the Anonisik Lightroot and head north. There is just one Yiga Clan member on an armored truck. Take them out with an arrow and head straight for the small shack to claim your prize.
Yiga Schematic 25 - Rainmaker
Yiga Schematic 25 - Rainmaker
The Rainmaker Schematic is hidden in a Yiga Hideout just west of the Abandoned Lanayru Mine. Fast travel to the Uihcoke Lightroot and make your way southeast to get there. Be careful of the Lynel you might run into on the way!
Disarm the flamethrowers on the gates and climb the central pillar. Take out the Yiga Footsoldier on the plane to unlock the treasure room, turn around, and run straight in to claim your prize.
Yiga Schematic 26 - Instant Kitchen
Yiga Schematic 26 - Instant Kitchen
The Instant Kitchen Schematic is in the Yiga Clan Hideout just north of the Crenel Canyon Mine. Fast travel to the Nojoj Lightroot and head directly north to get there. Don’t forget to open the treasure chest in Crenel Canyon Mine to find the Trousers of the Sky!
Once you reach the base, make your way to the large central pillar and head for the top. There are thorns along the pillar, so ascending is a great way to avoid them. Once you reach the top, aim your bow toward the Yiga Footsoldier on the plane, take them out, and claim the Schematic.
Yiga Schematic 27 - Triple Cannon
Yiga Schematic 27 - Triple Cannon
This Yiga Clan Hideout is just east of the Ploymus Canyon Mine. It’s very easy to get to, but pretty tough to infiltrate. Start your mission by traveling to the Sisinatag Lightroot and gliding south to the Hideout below.
The base is armed with two spinning laser emitters that will knock you out of the sky if you come from above, so hit that with an arrow to disarm it. Glide further into the base and pull your bow out again to hit the Yiga Footsoldier driving below to unlock the Schematic hut.
Yiga Schematic 28 - Icebreaker
Yiga Schematic 28 - Icebreaker
The Icebreaker Schematic is in the Yiga Hideout north of the Wellspring of Courage. To get there quickly, fast travel to the Kegopa Lightroot and head southwest.
The hideout is a well-guarded fortress with laser emitters around the perimeter. Avoid them by heading in the north opening and running around the outer wall until you can head deeper inside. Scale the tall building, wait until the Yiga Footsoldier comes around the corner on the minecart, and jump off. Pull out your bow in midair so you can slow time and make your shot easier.
Keep gliding until you reach the hut in the center of the maze, head in, and grab your treasure.
Yiga Schematic 29 - Super Spring
Yiga Schematic 29 - Super Spring
This Yiga Hideout is northeast of the Abandoned Kakariko Mine and just east of the Takaruk Lightroot.
The easiest way to infiltrate this base is to use the springs lying around to launch yourself to the top of the pillars. Then ascend up the large mushroom at the top of the base so you have a good aim toward the Yiga Footsoldier on the plane. Take the Footsoldier out with your bow, and glide to the pillar beside you to collect your Schematic.
Yiga Schematic 30 - Tank
Yiga Schematic 30 - Tank
The Tank Schematic can be found at the Yiga Hideout west of the Wellspring of Wisdom. The Wellspring of Wisdom is directly underneath the Mount Lanayru Skyview Tower.
There is only one Yiga Footsoldier guarding this base, but they are riding a tank equipped with bombs, so approach with caution. Climb onto the building to the left of the sealed hut and take aim at the Yiga Footsoldier with your bow. Take them out, and waltz straight into the shack to retrieve the Schematic.
Yiga Schematic 31 - Scatter Trap
Yiga Schematic 31 - Scatter Trap
This Yiga Clan Hideout is almost directly north of the Secluded Coliseum which is underneath Fort Hateno. To get there, fast travel to the Sohse Lightroot and head northeast, being careful to avoid the horde of Bokoblin Riders on the way.
There are a couple of flamethrowers around the perimeter of the base which can be easily disarmed with arrows and a Yiga Footsoldier on a plane. Ignore the plane and sneak right up to the Yiga that holds the seal. They are manning a hoverstone device but have next to no peripheral vision, so you can easily sneak up on them from the side to take them out. Then head straight into the hut to collect the Scatter Trap Schematic.
Yiga Schematic 32 - Liftoff Glider
Yiga Schematic 32 - Liftoff Glider
The Liftoff Glider Schematic is hidden in a Yiga Hideout southwest of the Abandoned Hateno Mine. Fast travel to the Kimnaz Lightroot and make your way southwest to reach it.
The Yiga Footsoldier that holds the seal is flying around the top of the base on a plane, so the key is to gain as much altitude as possible. Thankfully there aren’t many obstacles standing between you and the Footsoldier, so you are free to begin climbing without much to worry about.
Get as high as you can and hit the Yiga Footsoldier with an arrow when you’re close enough.
Yiga Schematic 33 - Water Freezer
Yiga Schematic 33 - Water Freezer
The Water Freezer Schematic is hidden in a Yiga Hideout at the very bottom of the map. Fast travel to the Kohsustu Lightroot and head southwest to get there.
There is one Yiga Footsoldier on a raft and two on planes. One of the planes has the Yiga Clan Member with the seal, so ignore the raft and run onto the platform on the north side of the lake. Wait for the Yiga Footsoldier to fly past, and knock them out of the sky with an arrow.
Head to the hut in the center of the lake to collect your prize. There is a frost emitter on the side that can freeze you on your way past, so disarm that with an arrow before heading inside.
Yiga Schematic 34 - Beam Spinner
Yiga Schematic 34 - Beam Spinner
The last Schematic to collect lies to the northwest of the Wellspring of Courage and southeast of the Great Abandoned Central Mine. It’s almost right next to the Busus Lightroot, so fast travel there to get to your destination as quickly as possible.
There are two Yiga Footsoldiers guarding this base. Both are riding motorbikes, one with a shock emitter attached to it, and the other with a flamethrower. Keep your distance and pick each one off with an arrow to clear your way to the last Schematic, the Beam Spinner.