
Frostbite Armor Set
The Frostbite Armor Set in The Legend of Zelda: Tears of the Kingdom was originally intended for ancient rituals, but thanks to its cold-absorbing cloth, the set grants Link the Cold Weather Attack ability by adding frost damage to his attacks in chilly environments.
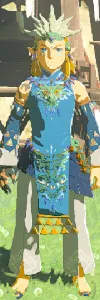
The Frostbite Armor Set in The Legend of Zelda: Tears of the Kingdom was originally intended for ancient rituals, but thanks to its cold-absorbing cloth, the set grants Link the Cold Weather Attack ability by adding frost damage to his attacks in chilly environments.
In this guide, you can find out more about the Frostbite Armor Set, including where to find each piece of Armor.
Frostbite Armor Set

The Frostbite Armor Set is comprised of three pieces of armor. Click the links above to learn more about a specific piece of armor or check out the table below for some quick stats:
Frostbite Armor Set
Armor
Defense
Effect Bonus
Frostbite Headdress
2
1 Cold Weather Attack
Frostbite Shirt
2
1 Cold Weather Attack
Frostbite Trousers
2
1 Cold Weather Attack
If you plan on equipping all three items to make the most of the set’s icy attacks, aware that the Frostbite set won’t protect you from extreme cold temperatures.
Where to Find the Frostbite Armor Set in TotK
- Where to Find the Frostbite Headdress
- Where to Find the Frostbite Shirt
- Where to Find the Frostbite Trousers
Where to Find the Frostbite Headdress in TotK
To find the Frostbite Headdress, you’ll need to head to Lake Kilsie Cave in the Hebra Mountains region. The cave is located at the northern tip of Lake Kilsie, so the quickest way to get there is by traveling to the Rospro Pass Skyview Tower and using your paraglider.
Coordinates: -3923, 2843, -0016
After entering the cave, jump off the edge and use your paraglider to glide over to the right wall, then climb up to the opening at the top. There’s a wall of rubble blocking the entrance, but it’s easy enough to clear using an appropriate weapon, such as a Rock Sledge, or by throwing a bomb flower. In the room beyond, you’ll find a chest at coordinates -3882, 2888, -0006 containing the Frostbite Headdress.
Where to Find the Frostbite Shirt in TOTK
The Frostbite Shirt is tucked away in Brightcap Cave, just southeast of Rito Village. It’s a long descent from Rospro Pass Skyview Tower, but if you’ve already found the Oromuwak Shrine, it's much quicker to travel from there.
Coordinates: -2991, 1650, 0200
As a bonus, you can start the ‘Cave Mushrooms That Glow’ side quest while you’re here by talking to Nat and Meghyn, who are standing just outside the cave entrance. If you happen to have 10 Brightcaps on you, hand them over to complete the quest immediately.
Head into the cave and drop down to follow the tunnel around to the right. There’s a Horriblin and Like Like hanging from the ceiling here, but you can run past both if you’re not in the mood for a fight. Hug the right side of the cave and continue pushing ahead until you reach a wall of thorns. Burn the thorns by using a Fire Arrow (infuse an arrow with Fire Fruit), or a weapon like the Zonai Flame Emitter. Wait a few seconds for the thorns to clear and then walk up to the chest to claim the Frostbite Shirt at coordinates -3042, 1529, 0187.
Where to Find the Frostbite Trousers in TOTK
For the final piece, make your way to the Hebra Headspring Cave, located at the north-west edge of Hebra Headspring river in Tabantha Frontier. Once again, Rospro Pass Skyview Tower is the closest tower to warp to, but it will be a bit of a trek.
Coordinates: -2887, 2503, 0393
The Frostbite Trousers are arguably the trickiest piece of the armor set to retrieve as they’re in a cave filled with water, which will freeze you if you’re submerged for too long. However, if you time your jumps carefully, you should be able to avoid an icy demise.
Enter the cave and stick to the left side where you’ll notice two pillars in the water. Climb the first pillar, then glide over to the second and stand on top. Try to climb these pillars quickly to avoid slipping into the water below.
If you’ve unlocked Tulin’s Gust ability, now is the perfect time to activate it. Ride the gust across to the wall opposite and scale the wall to climb through the small hole at the top. There’s a strip of ice right under the opening, so climb as close as you can to the edge of it and time your jump to avoid landing right on it and sliding downwards. The Frostbite Trousers are found in the chest in this room, located at coordinates -2906, 2570, 0402.
Frostbite Set Armor Upgrades
After you find and unlock the Great Fairy Fountains in Hyrule, you can bring them ingredients and a donation of rupees to increase the armor value of each piece of armor. All pieces of the Frostbite's Set will require the same materials to upgrade each. See the table below for the ingredients needed and defense bonus you can gain for each piece of armor.